Using Public Folders
Public folders are
contained in public folder stores. The public folder listing that is
viewed by the client software, such as Outlook, is arranged in a tree
structure that is called a public folder tree (also known as a
hierarchy). Any public folder that contains subfolders is referred to as
a parent folder, and a parent folder can contain child folders that
exist as subfolders. Public folders that are created at the root of a
public folder tree are referred to as top-level folders.
Public folders provide a number of benefits, including the following:
Allowing messages
to be sent to public folders using e-mail addresses that are stored in
Active Directory directory service instead of posting messages to the
folders.
Allowing users both internal to the Exchange Server 2003 organization and external to the organization to collaborate.
Making newsgroups available to users.
Allowing Web browsers to gain access to public folders by specifying a Uniform Resource Locater (URL) to that folder.
Performing full-text index searches on public folder contents.
Allowing
users to gain access to any public folder in the organization. By
default, Exchange Server 2003 enables public folder referrals between
routing groups.
There
are other uses for public folders, as well. Public folders are very
flexible in that they are able to hold almost any kind of data you might
want to store and make that data available to other users. Public
folders are often used to provide a customer feedback e-mail address. If
you used a standard user mailbox in this situation, you would have
messages being sent to a single individual. If you used a distribution
list for the feedback e-mail address, everyone in the list would receive
every e-mail sent to the address, which might not be desirable,
particularly if an executive manager wanted to be able to monitor the
feedback e-mail periodically but without having to receive all of the
messages in his or her own mailbox. By using a public folder
arrangement, feedback e-mails from customers could be posted to the
public folder and permissions granted to the folder for everyone who
needed access. This would create a central repository for the e-mail
messages.
Another common scenario
for using public folders is to create group or departmental shared
calendars. These calendars can be used for tracking sales appointments
for a sales staff, maintaining an employee vacation schedule, listing
employee birthdays or anniversary dates, and so on.
Creating Public Folders
There are two ways to
create public folders. The most common way is by using Outlook because
users can easily create their own public folders inside of top-level
folders to which they have been granted permission. This eases the
administrative burden since the administrator does not have to create
every public folder that is required. With the Exchange Server 2003
version of Outlook Web Access (OWA), you can use and create public
folders. This is a significant upgrade from the Exchange Server 5.5
version of OWA, which had no support for public folders. The other
method used to create public folders is to use Exchange System Manager.
This method accomplishes the same thing as creating public folders in
Outlook, but this method is used exclusively by Exchange administrators.
Creating Public Folders in Outlook
By default, all users
in an Exchange organization can create public folders under the All
Public Folders top-level folder. This default behavior can be modified. To create a public folder in Outlook 2003, perform the following steps:
1. | Expand
the Public Folders container in the Folder List, and then expand the
All Public Folders container to see the list of current public folders.
|
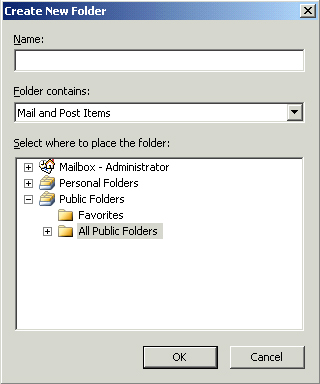
2. | Right-click All Public Folders, and then click New Folder. This will open the Create New Folder dialog box, shown in Figure 1.
|
3. | Type a name for the folder. The name should be descriptive and identify the purpose of the folder.
|
4. | The
default type of items for a new public folder is Mail And Post Items.
However, you can click the drop-down list to select one of the
following:
Calendar Items Contact Items Journal Items Note Items Task Items
Choose the type of items you want the folder to contain. Each public folder can contain only one of the above item types.
|
5. | The
last configuration option is Select Where To Place The Folder. It will
default to the folder you were in when you chose to create a new folder,
in this case All Public Folders. You can easily navigate to a different
folder, if desired, and folders can be nested inside one another. Once
you select a location, click OK to create the public folder.
|
Creating Public Folders in OWA
Creating a public folder using OWA is very similar to creating a public folder using Outlook and can be done as follows:
1. | Log on to OWA, then click the Public Folders link from the navigation menu.
|
2. | A
new browser window will open with Public Folders as the root container.
This view maps directly to the All Public Folders container you saw in
Outlook, and you will see a list of public folders under the Public
Folders container.
|
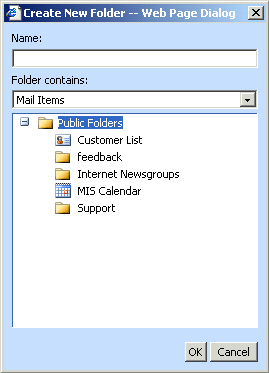
3. | Right-click Public Folders, and then click New Folder. The Create New Folder-Web Page Dialog dialog box, shown in Figure 2, opens.
|
4. | Enter the information to create a new public folder.
|
Creating Public Folders in Exchange System Manager
Exchange Server 2003
administrators can create public folders using Exchange System Manager.
This is especially useful for creating a hierarchy of top-level folders
for users and then assigning permissions so users can only create
subfolders in specific top-level folders. This allows the administrator
to control the amount of top-level folders and to keep the public folder
hierarchy from getting too cluttered and inefficient to use.
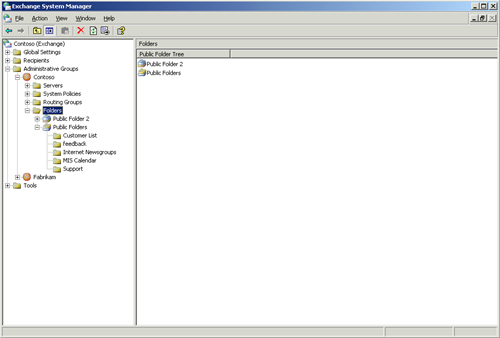
1. | Open
Exchange System Manager and navigate to an administrative group, and
then expand the Folders container to view the public folder trees, as
shown in Figure 3.
|
2. | Expand
the Public Folders container, which is the equivalent of the All Public
Folders container that displays in Outlook. This will show you the
current folders in your public folder tree.
|
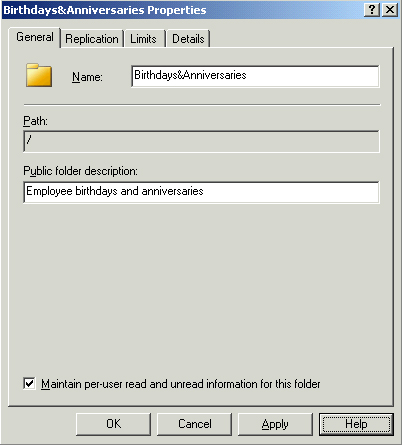
3. | Right-click
the Public Folders container, point to New, and then click Public
Folder. You will see a dialog box similar to the one shown in Figure 4.
|
4. | Fill
in the information to identify the folder. Note that there is no option
to configure the type of items the public folder will contain. The
folder will contain Mail And Post Items, which cannot be changed. These
folders can also be used to contain other folders, which can hold any
type of items. If you need to create public folders that will contain
items other than Mail And Post Items, you will need to use Outlook or
OWA to create them. |